Kamis, 05 September 2013

KONFIGURASI ROUTER PADA CISCO PACKET TRACER

Router adalah hardware yang berguna untuk menghubungkan dan merutekan paket data dari sebuah jaringan network ke network yang lain. Dalam kesempatan ini saya akan membuat jaringan menggunakan simulasi pada Packet Tracer dan kita akan melakukan konfigurasi router melalui pc. Dalam simulator ini sebenarnya sudah ada fasilitas untuk melakukan konfigurasi router langsung pada router. Namun dalam prakter yang sebenarnya kondisi fisik router tidak memiliki monitor, keyboard dan mouse untuk melakukan konfigurasi, sehingga untuk melakukannya kita harus melakukan koneksi dengan router.
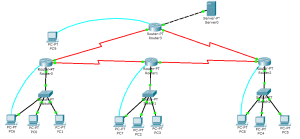
Langkah pertama kita membuat suatu topologi jaringan seperti pada gambar di bawah ini :
CCNA1
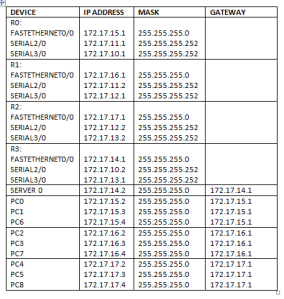
Dengan rancangan IP untuk menghubungkan jaringan :
CCNA3
Lakukan konfigurasi pada PC sesuai IP pada tabel di atas.
Setelah itu kita akan melakukan konfigurasi pada router melalui PC yang sudah dihubungkan dengan conection console yaitu garis berwarna biru.
Setingan pada router 0 melalui PC:
Router>ena
Router#config
Configuring from terminal, memory, or network [terminal]?
Enter configuration commands, one per line. End with CNTL/Z.
Router(config)#interface fa0/0
Router(config-if)#ip address 172.17.15.1 255.255.255.0
Router(config-if)#no shut
%LINK-5-CHANGED: Interface FastEthernet0/0, changed state to up
%LINEPROTO-5-UPDOWN: Line protocol on Interface FastEthernet0/0, changed state to up
Router(config-if)#exit
Router(config)#interface se2/0
Router(config-if)#ip address 172.17.11.1 255.255.255.252
Router(config-if)#clock rate 64000
Router(config-if)#no shut
Router(config-if)#exit
Router(config)#interface se3/0
Router(config-if)#ip address 172.17.10.1 255.255.255.252
Router(config-if)#clock rate 64000
Router(config-if)#no shut
Router(config-if)#exit
Router(config)#ip route  172.17.12.0 255.255.255.252 172.17.11.2
Router(config)#ip route  172.17.14.0 255.255.255.0 172.17.10.2
Router(config)#ip route  172.17.16.0 255.255.255.0 172.17.11.2
Router(config)#ip route  172.17.17.0 255.255.255.0 172.17.12.2
Router(config)#no shut
Setingan pada router 1 :
Router>ena
Router#config
Configuring from terminal, memory, or network [terminal]?
Enter configuration commands, one per line. End with CNTL/Z.
Router(config)#interface fa0/0
Router(config-if)#ip address 172.17.16.1 255.255.255.0
Router(config-if)#no shut
%LINK-5-CHANGED: Interface FastEthernet0/0, changed state to up
%LINEPROTO-5-UPDOWN: Line protocol on Interface FastEthernet0/0, changed state to up
Router(config-if)#exit
Router(config)#interface se2/0
Router(config-if)#ip address 172.17.11.2 255.255.255.252
Router(config-if)#clock rate 64000
Router(config-if)#no shut
Router(config-if)#exit
Router(config)#interface se3/0
Router(config-if)#ip address 172.17.12.1 255.255.255.252
Router(config-if)#clock rate 64000
Router(config-if)#no shut
Router(config-if)#exit
Router(config)#ip route  172.17.15.0 255.255.255.0 172.17.11.1
Router(config)#ip route  172.17.17.0 255.255.255.0 172.17.12.2
Router(config)#ip route  172.17.10.0 255.255.255.252 172.17.11.1
Router(config)#ip route  172.17.14.0 255.255.255.0 172.17.10.2
Router(config)#no shut
Setingan pada router 2 :
Router>ena
Router#config
Configuring from terminal, memory, or network [terminal]?
Enter configuration commands, one per line. End with CNTL/Z.
Router(config)#interface fa0/0
Router(config-if)#ip address 172.17.17.1 255.255.255.0
Router(config-if)#no shut
%LINK-5-CHANGED: Interface FastEthernet0/0, changed state to up
%LINEPROTO-5-UPDOWN: Line protocol on Interface FastEthernet0/0, changed state to up
Router(config-if)#exit
Router(config)#interface se2/0
Router(config-if)#ip address 172.17.12.2 255.255.255.252
Router(config-if)#clock rate 64000
Router(config-if)#no shut
Router(config-if)#exit
Router(config)#interface se3/0
Router(config-if)#ip address 172.17.13.2 255.255.255.252
Router(config-if)#clock rate 64000
Router(config-if)#no shut
Router(config-if)#exit
Router(config)#ip route  172.17.16.0 255.255.255.0 172.17.12.1
Router(config)#ip route  172.17.14.0 255.255.255.0 172.17.13.1
Router(config)#ip route  172.17.15.0 255.255.255.0 172.17.11.1
Router(config)#ip route  172.17.11.0 255.255.255.252 172.17.12.1
Router(config)#no shut
Setingan pada router 3 :
Router>ena
Router#config
Configuring from terminal, memory, or network [terminal]?
Enter configuration commands, one per line. End with CNTL/Z.
Router(config)#interface fa0/0
Router(config-if)#ip address 172.17.14.1 255.255.255.0
Router(config-if)#no shut
%LINK-5-CHANGED: Interface FastEthernet0/0, changed state to up
%LINEPROTO-5-UPDOWN: Line protocol on Interface FastEthernet0/0, changed state to up
Router(config-if)#exit
Router(config)#interface se2/0
Router(config-if)#ip address 172.17.10.2 255.255.255.252
Router(config-if)#clock rate 64000
Router(config-if)#no shut
Router(config-if)#exit
Router(config)#interface se3/0
Router(config-if)#ip address 172.17.13.1 255.255.255.252
Router(config-if)#clock rate 64000
Router(config-if)#no shut
Router(config-if)#exit
Router(config)#ip route  172.17.15.0 255.255.255.0 172.17.10.1
Router(config)#ip route  172.17.17.0 255.255.255.0 172.17.13.2
Router(config)#ip route  172.17.11.0 255.255.255.252 172.17.10.1
Router(config)#ip route  172.17.16.0 255.255.255.0 172.17.11.2
Router(config)#no shut.
Setelah selesai konfigurasi selanjutnya lakukan pengujian dengan cara melakukan ping seperti pada gambar berikut :
(Ping dari PC 0 ke Server 0)
ping1
(Ping dari Server ke PC)
PING2
Lakukan pada seluruh PC agar koneksi benar-benar saling terhubung

Konfigurasi Cisco Router sebagai Internet Gateway

Artikel berikut ini merupakan tahapan konfigurasi yang dapat digunakan untuk membuat sebuah Router Cisco menjadi Internet Gateway bagi sebuah jaringan lokal (LAN). Hasil akhir yang ingin dicapai adalah komputer-komputer pada LAN adalah dapat meng-akses layanan Internet. Adapun contoh topologi yang akan digunakan adalah sebagai berikut.
 basic_cisco_gateway
Sedangkan tahapan-tahapan konfigurasi yang perlu dilakukan adalah sebagai berikut:
  • Konfigurasi IP Address pada setiap interface
  • Konfigurasi default gateway melalui ISP
  • Konfigurasi DNS Server
  • Konfigurasi NAT (masquerade)
  • Konfigurasi DHCP Server untuk membagi IP Adress secara otomatis kepada komputer pada LAN

Konfigurasi IP Address

Sesuai skenario maka konfigurasi IP Address pada setiap interface adalah sebagai berikut.
GATEWAY#
GATEWAY#configure terminal
GATEWAY(config)#interface f0/0
GATEWAY(config-if)#ip address 80.1.1.2 255.255.255.252
GATEWAY(config-if)#no shutdown
GATEWAY#
GATEWAY#configure terminal
Enter configuration commands, one per line.  End with CNTL/Z.
GATEWAY(config)#interface f0/1
GATEWAY(config-if)#ip address 192.168.10.1 255.255.255.0
GATEWAY(config-if)#no shutdown
Pengujian apakah interface tersebut telah memiliki IP Address dan dalam keadaan aktif, dapat digunakan perintah sebagai berikut.
GATEWAY#show ip interface brief
Interface              IP-Address      OK? Method Status                Protocol
 
FastEthernet0/0        80.1.1.2        YES manual up                    up
 
FastEthernet0/1        192.168.10.1    YES manual up               up

Konfigurasi Default Gateway

Perintah yang dapat digunakan untuk memberikan entry default route ke Internet melalui ISP adalah sebagai berikut.
GATEWAY(config)#ip route 0.0.0.0 0.0.0.0 80.1.1.1
Pengujian dapat dilakukan dengan melihat tabel routing, seharusnya tabel routing akan terlihat seperti berikut ini.
GATEWAY#show ip route
Codes: C – connected, S – static, I – IGRP, R – RIP, M – mobile, B – BGP
       D – EIGRP, EX – EIGRP external, O – OSPF, IA – OSPF inter area
       N1 – OSPF NSSA external type 1, N2 – OSPF NSSA external type 2
       E1 – OSPF external type 1, E2 – OSPF external type 2, E – EGP
       i – IS-IS, L1 – IS-IS level-1, L2 – IS-IS level-2, ia – IS-IS inter area
       * – candidate default, U – per-user static route, o – ODR
       P – periodic downloaded static route
Gateway of last resort is 80.1.1.1 to network 0.0.0.0
     80.0.0.0/30 is subnetted, 1 subnets
C       80.1.1.0 is directly connected, FastEthernet0/0
C    192.168.10.0/24 is directly connected, FastEthernet0/1
S*   0.0.0.0/0 [1/0] via 80.1.1.1


Konfigurasi DNS Server

Untuk dapat membuat Router Cisco dapat melakukan ping ke hostname atau domain yang ada di Internet, maka perlu dilakukan konfigurasi DNS Server dengan menggunakan perintah seperti berikut ini.
GATEWAY(config)#ip name-server 80.1.1.1

Konfigurasi Network Address Translation

Untuk membuat komputer LAN mendapatkan layanan Internet, maka Router Cisco harus menjalankan NAT (masquerade) untuk network 192.168.10.0/24. Konfigurasi yang dapat digunakan adalah sebagai berikut
GATEWAY(config)#access-list 1 permit 192.168.10.0 0.0.0.255
GATEWAY(config)#ip nat inside source list 1 interface f0/0 overload

GATEWAY(config)#interface f0/0
GATEWAY(config-if)#ip nat outside
GATEWAY(config-if)#interface f0/1
GATEWAY(config-if)#ip nat inside
Sampai pada tahapan ini, seharusnya komputer pada LAN sudah dapat mengakses layanan Internet.

Konfigurasi DHCP

Untuk membuat komputer LAN bisa mendapatkan IP Address secara dinamik, maka Router Cisco harus menjalankan DHCP Server. Perintah yang dapat digunakan untuk mengkonfigurasikan DHCP Server adalah sebagai berikut.
GATEWAY(config)#ip dhcp excluded-address 192.168.10.26 192.168.10.254
GATEWAY(config)#ip dhcp pool LAN-POOL-1
GATEWAY(dhcp-config)#network 192.168.10.0 255.255.255.0
GATEWAY(dhcp-config)#default-router 192.168.10.1
GATEWAY(dhcp-config)#dns-server 80.1.1.1
GATEWAY(dhcp-config)#exit
IP Address 192.168.10.26 sampai dengan 192.168.10.254 adalah IP Address yang tidak akan diberikan kepada komputer pada LAN.

Selasa, 30 Juli 2013

Install LAMP on Ubuntu

Install Apache

To start off we will install Apache.
1. Open up the Terminal (Applications > Accessories > Terminal).
2. Copy/Paste the following line of code into Terminal and then press enter:
sudo apt-get install apache2
3. The Terminal will then ask you for you're password, type it and then press enter.

Testing Apache

To make sure everything installed correctly we will now test Apache to ensure it is working properly.
1. Open up any web browser and then enter the following into the web address:
http://localhost/
You should see a folder entitled apache2-default/. Open it and you will see a message saying "It works!" , congrats to you!

Install PHP

In this part we will install PHP 5.
Step 1. Again open up the Terminal (Applications > Accessories > Terminal).
Step 2. Copy/Paste the following line into Terminal and press enter:
sudo apt-get install php5 libapache2-mod-php5
Step 3. In order for PHP to work and be compatible with Apache we must restart it. Type the following code in Terminal to do this:
sudo /etc/init.d/apache2 restart

Test PHP

To ensure there are no issues with PHP let's give it a quick test run.
Step 1. In the terminal copy/paste the following line:
sudo gedit /var/www/testphp.php
This will open up a file called phptest.php.
Step 2. Copy/Paste this line into the phptest file:
Step 3. Save and close the file.
Step 4. Now open you're web browser and type the following into the web address:
http://localhost/testphp.php

Install MySQL

To finish this guide up we will install MySQL. (Note - Out of Apache and PHP, MySQL is the most difficult to set up. I will provide some great resources for anyone having trouble at the end of this guide.)
Step 1. Once again open up the amazing Terminal and then copy/paste this line:
sudo apt-get install mysql-server
Step 2 (optional). In order for other computers on your network to view the server you have created, you must first edit the "Bind Address". Begin by opening up Terminal to edit the my.cnf file.
gksudo gedit /etc/mysql/my.cnf
Change the line
bind-address = 127.0.0.1
And change the 127.0.0.1 to your IP address.
Step 3. This is where things may start to get tricky. Begin by typing the following into Terminal:
mysql -u root
Following that copy/paste this line:
mysql> SET PASSWORD FOR 'root'@'localhost' = PASSWORD('yourpassword');
(Make sure to change yourpassword to a password of your choice.)
Step 4. We are now going to install a program called phpMyAdmin which is an easy tool to edit your databases. Copy/paste the following line into Terminal:
sudo apt-get install libapache2-mod-auth-mysql php5-mysql phpmyadmin
After that is installed our next task is to get PHP to work with MySQL. To do this we will need to open a file entitled php.ini. To open it type the following:
gksudo gedit /etc/php5/apache2/php.ini
Now we are going to have to uncomment the following line by taking out the semicolon (;).
Change this line:
;extension=mysql.so
To look like this:
extension=mysql.so
Now just restart Apache and you are all set!
sudo /etc/init.d/apache2 restart

Jumat, 26 Juli 2013

Configure static NAT for inbound connections

Someone recently asked me how to configure Network Address Translation (NAT) so that computers on the Internet could access his internal Web and mail server through his Cisco router. This requires configuring a static NAT translation between the dedicated public IP address and the dedicated private IP address. Here's how to do it.
Most people use NAT to connect to the Internet these days. NAT transforms private IP addresses to public IP address so users can access the public Internet. Most of us use a form of NAT called Port Address Translation (PAT), which Cisco refers to as NAT overload. (For more information, see "Set up NAT using the Cisco IOS" and "Set up Port Address Translation (PAT) in the Cisco IOS.")
To start off, let's get a better idea of what we're working with. Figure A offers a diagram to help visualize the network.
Our example network
Here's our goal: We want to configure a static IP translation through the router from the outside (i.e., Internet) network to the inside (i.e., private) network.
On a Linksys router with a basic Web interface, this isn't very hard to do. However, on a Cisco router using the command-line interface (CLI), you'll struggle if you don't know the proper commands or where to apply them.
It's a good idea to gather the data you'll need before you start. Here's the information we need for our example:
  • Router inside interface E0/0: IP 10.1.1.1
  • Router outside interface S0/0: IP 63.63.63.1
  • Web/mail server private IP: 10.1.1.2
  • Web/mail server public IP: 63.63.63.2
There are two important steps to get this traffic inside your network and to your Web/mail server:
  1. NAT configuration
  2. Firewall configuration
In this post, I'll provide the basic static NAT configuration. However, make sure that whatever you're using for your firewall also allows this traffic in.
Whether you're using basic access control lists (ACLs) or the Cisco IOS firewall feature set, make sure you understand the Cisco IOS order of operations to configure your firewall for the right IP addresses (public or private). In other words, what happens first -- NAT translation or firewall filtering? For example, when using ACLs, a check of the input ACL occurs before NAT translation. So, you need to write ACLs with the public IP addresses in mind.
Now that we've covered the background info, let's get started with configuring static NAT. For our example, let's say we start out with this basic configuration:
interface Serial0/0
  ip address 63.63.63.1 255.255.255.0
  ip nat outside
interface Ethernet0/0
  ip address 10.1.1.1 255.255.255.0
  ip nat inside
We need the NAT translations to translate the outside IP address of the Web/mail server from63.63.63.2 to 10.1.1.2 (and from 10.1.1.2 to 63.63.63.2). Here's the missing link between the outside and inside NAT configurations:
router (config)# ip nat inside source static tcp 10.1.1.2 25 63.63.63.2 25
router (config)# ip nat inside source static tcp 10.1.1.2 443 63.63.63.2 443
router (config)# ip nat inside source static tcp 10.1.1.2 80 63.63.63.2 80
router (config)# ip nat inside source static tcp 10.1.1.2 110 63.63.63.2 110
We used the above port numbers because they fit the description of what we wanted to do, but keep in mind that your port numbers may be different. I chose port 25 for SMTP (sending mail), port 443 for HTTPS (secure Web), port 80 for HTTP (Web traffic), and port 110 for POP3 (receiving mail from the mail server when out on the Internet).
This configuration assumes you have a block of IP addresses. If you don't, you can use the outside IP address on your router (Serial 0/0 in our case), and you could configure it like this:
router (config)# ip nat inside source static tcp 10.1.1.2 25 interface serial 0/0 25
You can even use this command if you have a dynamic DHCP IP address from your ISP on the outside of your router.
We also need to register the IP address of the mail and Web server in the global Internet DNS registry. So when users enter www.mywebserver.com in their Web browser, the browser would translate it to 63.63.63.2, and the router would then translate it to 10.1.1.2. The Web server would receive that request and respond back through the router, which would translate it back to the global IP address.

In addition to configuring static NAT, you may want to use dynamic NAT at the same time. With this, your inside PCs could access the Internet using dynamic NAT (i.e., NAT overload or PAT). But this gets a little more complex. For more information, see Cisco's Configuring Static and Dynamic NAT Simultaneously documentation.

Selasa, 16 Juli 2013

Manajemen Bandwidth Di Squid Menggunakan Delay Pools

Dokumen ini menjelaskan bagaimana cara mengkonfigurasikan proxy server anda untuk membatasi bandwidth download atau incoming traffic.
Berikut langkah-langkah pengkonfigurasian manajemen bandwidth di squid:
1. Pertama-tama periksa apakah squid telah berjalan di server dan telah dikonfiguraisi sebagai mesin proxy server.
2. Sebelum memulai memanajemen bandwidth di squid, kita jelaskan dulu komponen-komponen manajement bandwidth di squid :

delay_pools
Opsi ini untuk menspesifikasi berapa jumlah pool yang digunakan untuk membatasi jumlah bandwidth dari ACL. Opsi ini akan dirangkaikan bersama opsi delay_class dan delay_parameters yang akan dibahas di bawah ini.
delay_class
Opsi ini menspesifikasikan kelompok dari masing-masing pool yang telah didefinisikan pada opsi delay-pools. Ada tiga class yang didukung Squid, antara lain:
• class 1: Semua akses dibatasi dengan single bucket, artinya hanya bisa mendefinisikan overall bandwidth untuk suatu ACL saja, tidak bisa mendefinisikan bandwidth dengan lebih mendetail
• class 2: Semua akses dibatasi dengan single agregate dengan dua parameter bandwidth. Parameter pertama mendefinisikan berapa bandwidth maksimal yang didapatkan ACL, parameter kedua mendefinisikan berapa bandwidth overall untuk ACL yang spesifik yang ada pada network tersebut.
• class 3: Kelompok yang definisi bandwidth-nya paling mendetail. Parameter pertama mendefinisikan berapa bandwidth maksimal yang didapatkan ACL, parameter kedua mendefinisikan berapa bandwidth normal yang didapatkan ACL secara umum, dan parameter yang ketiga adalah mendefinisikan bandwidth yang didapatkan ACL jika mengakses ACL-ACL tertentu yang spesifik, misalnya file mp3.
delay_parameters
Opsi ini menspesifikasikan rumus bandwidth yang akan didapatkan oleh ACL yang akan memasuki delay_pool. Misalnya ada entry berikut ini pada delay_parameters:
delay_parameters 1 -1/-1 2100/4000
Angka 1 berarti rumus ini berlaku untuk pool 1. Angka -1/-1 berarti bandwidth maksimal yang diberikan Squid adalah tidak terbatas untuk pool ini.
Angka 2100/4000 berarti bandwidth yang didapatkan oleh ACL setelah masuk ke pool ini. Angka ini berada dalam kelipatan 8 b, sehingga untuk mendapatkan nilai bandwidth yang sebenarnya harus dikalikan delapan. Angka 2100 adalah bandwidth yang didapatkan ACL pada masa-masa normal. Jika dikalikan 8, maka bandwidth normal yang akan didapatkan ACL sekitar 18 Kbps. Angka 4000 adalah bandwidth maksimal yang didapatkan ACL pada masa-masa jalur sedang kosong. Jika dikalikan 8, maka bandwidth yang didapatkan sekitar 32 Kbps.
delay_access
Opsi ini mendefinisikan siapa-siapa ACL yang akan dimasukkan ke pool tertentu untuk mendapatkan “perlambatan” bandwidth. Bentuk umumnya adalah seperti ini:
delay_access 1 allow labprog
Opsi di atas berarti kita memasukkan ACL labprog ke dalam pool 1.
3. Jika sudah mengerti komponen-komponen delay pool, kita mulai konfigurasi delay pool .
Di umpamakan kita mempunyai bandwidth dari ISP sebesar 512kb, dan kita membuat rule seperti berikut ini:
- Batas kecepatan koneksi overall adalah 256 Kbps. per-network adalah 64 kbps. Sedangkan per-user/host dibatasi 2 Kbps jika digunakan untuk download file bertipe exe, mp3, vqf, tar.gz, gz, rpm, zip, rar, avi, mpeg, mpe, mpg, qt, ram, rm, iso, raw, dan wav. Jika tidak, maka koneksi perhost HANYA mengikuti aturan per-Network saja.
Penyelesaian:

Edit file /etc/squid/squid.conf
#vi /etc/squid/squid.conf
Lalu tambahkan contoh konfigurasi ini:
# Sebelum kita melakukan pembatasan, kita perlu mendefinisikan ACL network # # yang kita perlukan terlebih dahulu. ACL yang didefinisikan pada host bridge
# seperti di bawah ini:
acl lokal src 192.168.1.0/24# Kemudian kita membatasi maksimum download dengan tag di bawah ini:
# Batas kecepatan koneksi overall adalah 256 Kbps. per-network adalah
# 64 kbps. Sedangkan per-user/host dibatasi 2 Kbps jika digunakan untuk
# download file bertipe exe, mp3, vqf, tar.gz, gz, rpm, zip, rar, avi,
# mpeg, mpe, mpg, qt, ram, rm, iso, raw, dan wav. Jika tidak, maka
# koneksi perhost HANYA mengikuti aturan per-Network saja.
acl filegede url_regex -i \.exe
acl filegede url_regex -i \.mp3
acl filegede url_regex -i \.vqf
acl filegede url_regex -i \.gz
acl filegede url_regex -i \.rpm
acl filegede url_regex -i \.zip
acl filegede url_regex -i \.rar
acl filegede url_regex -i \.avi
acl filegede url_regex -i \.mpeg
acl filegede url_regex -i \.mpe
acl filegede url_regex -i \.mpg
acl filegede url_regex -i \.qt
acl filegede url_regex -i \.ram
acl filegede url_regex -i \.rm
acl filegede url_regex -i \.iso
acl filegede url_regex -i \.raw
acl filegede url_regex -i \.wav
# Kita buat dulu ACL untuk mendefinisikan file-file di atas dengan menggunakan # regularexpression. Kemudian kita mendefinisikan 2 delay pool untuk
# menampung bandwidth.
# Satu pool masuk dalam kategori class 2 untuk mendefinisikan aturan overall
# 256 Kbps dan per-network 64 Kbps. Satu pool lainnya masuk kategori class 3
# untuk mendefinisikan aturan tambahan jika user mendownload file-file yang
#didefinisikan dalam ACL url_regex dengan bandwidth maksimal 2 Kbps.

delay_pools 2
delay_class 1 3
delay_parameters 1 32000/32000 8000/8000 250/250
delay_access 1 allow lokal filegede
delay_access 1 deny all
delay_class 2 2
delay_parameters 2 32000/32000 8000/8000
delay_access 2 allow lokal
delay_access 2 deny all
Jika sudah selesai, simpan hasil konfigurasi dan restart squid

#/etc/init.d/squid restart

Senin, 24 Juni 2013

Clear chace squid proxy

Cek ukuran direktori spool squid
# du -sh /var/spool/squid
Cek sisa harddisk
# df –k
Ternyata kapasitas tersisa harddisk tinggal 0%. Agenda hari ini jadi berubah deh, kita mulai proses memebersihkan cache squid.
#1 Harapannya agar besok gak jadi masalah lagi, cache_dir  pada squid.conf dikurangi. semoga kedepannya nanti gak perlu lagi uta-atik squid.
#2 Matikan proses Squid
# /etc/init.d/squid stop
atau
# squid –k stop
#3 Hapus direktori swap Squid, yang umumnya tersimpan pada direktori /var/spool/squid
# rm -fdR /var/spool/squid/
#4 Bangun kembali direktori swap yang sebelumnya dihapus
# squid -z
2009/04/01 11:12:38| Creating Swap Directories
FATAL: Failed to make swap directory /var/spool/squid: (13) Permission denied
Squid Cache (Version 2.6.STABLE13): Terminated abnormally.
CPU Usage: 0.001 seconds = 0.001 user + 0.000 sys
Maximum Resident Size: 0 KB
Page faults with physical i/o: 0
Ternyata muncul notifikasi error “Permission denied”. Terpaksa deh buat manual dulu direktori swap tersebut. Jangan lupa ganti pemilik direktori tersebut sesuai dengan user Squid (kebetulan cache_effective_user dikonfigurasi adalah squid). Kalau tidak, proses rebuild direktori swap dengan perintah “squid –z” akan mendapati notifikasi error yang serupa.
# mkdir /var/spool/squid
# chown squid /var/spool/squid
Ulangi lagi proses rebuild swap
# squid -z
2009/04/01 11:16:52| Creating Swap Directories
#5 Alhamdulillah, kali ini sukses. Sekarang jalankan lagi proses squid. Selesai sudah pembersihan cache squid proxy.
# /etc/init.d/squid start
Setelah pada router dikembalikan, dan cek akses web normal, selesai sudah rangkaian agenda yang tidak terjadwal ini.
Usut punya usut, ternyata yang bikin space harddisk Proxy habis adalah Sarg. Target utama: direktori sarg-backup yang tersimpan di /home dihapus. Kapasitas sisa yang didapat bisa sampai 50%. Tapi setelah sehari koq muncul lagi ya??? Cek crontab deh
# crontab -l
00 00 * * * cp -r /var/www/sarg /home/hafidz/sarg-backup
Ternyata ini to yang bikin harddisk penuh, hapus aja lah
 # crontab -e
Selesai sudah… seharusnya masih nggak perlu menghapus  direktori cache Squid hehehe… Besarin lagi dech cache_dir di squid.conf.

Sumber

Jumat, 31 Mei 2013

Transparent Proxy dengan Redirect pada Cisco

Pastikan dulu koneksi sudah berjalan normal sebelum ditambahkan transparent . Baik pada server maupun pc client. Pada konfigurasi dibawah, router sebagai gateway LAN dengan IP 10.128.10.1/24. Router, , dan firewall memiliki segment IP yang sama 172.18.10.0/29. Sedangkan firewall memiliki interface ke internet dan menjalankan fungsi NAT. Konfigurasi seperti ini tidak mutlak, hanya sebagai satu contoh aja.
http://farm2.static.flickr.com/1292/639044156_312dd50e7b.jpg
Setiap request http yang melalui router akan diredirect ke proxy server dengan policy-based routing.

Konfigurasi pada :
#ACL
access-list 110 deny tcp any any neq www
access-list 110 deny tcp host 172.18.10.3 any
access-list 110 deny tcp any 10.0.0.0 0.255.255.2551)
access-list 110 deny tcp any 172.0.0.0 0.31.255.2551)
access-list 110 deny tcp any 192.168.0.0 0.0.255.2551)
access-list 110 permit tcp any any
1)Contoh acl tambahan bila dibutuhkan akses ke beberapa webserver di jaringan lokal (intranet, WAN).

#POLICY
route-map proxy-redirect permit 10
match ip address 110
set ip next-hop 172.18.10.3
#Subinterface ke LAN
ip policy route-map proxy-redirect
Konfigurasi iptables pada Proxy Linux (Fedora Core 6):
iptables -A INPUT -p tcp -s 10.18.10.0/24 –dport 80 -j ACCEPT2)
iptables -A INPUT -p tcp -s 10.18.10.0/24 –dport 3128 -j ACCEPT2)
iptables -t nat -A PREROUTING -p tcp -s 10.18.10.0/24 -d –dport 80 -j REDIRECT –to-port 3128


sumber : http://blog.hafidz.web.id/transparent-proxy-dengan-redirect-pada-cisco.html

Senin, 01 April 2013

CRUD Codeigniter - Menghapus Data

Sebagai akhir dari seluruh tutorial operasi CRUD Codeigniter, kali saya akan memberikan tutorial proses Hapus Data. Ini operasi yang terakhir tentang dasar Codeigniter.
Dalam pembuatan proses penghapusan data, hendaknya kita tambahkan function hapusdata pada file controller ckomentar.php.
?
1
2
3
4
function hapusdata($id) {
        $this->db->delete('komentar', array('id' => $id));
        redirect('ckomentar/index');
}
Pada skrip diatas, dapat didefinisikan bahwa kita membuat function hapusdata yang menangkap variabel $id, kemudian didalamnya mengandung penghapusan terhadap tabel komentar berdasarkan id yang tertangkap.. selanjutnya halaman akan diarahkan kepada posisi index.
Demikian tutorial singkat dari saya. Semoga bermanfaat.

CRUD Codeigniter - Mengubah Data

yang harus kita perhatikan ada lah membuat 2 function pada file model (mkomentar.php). tambahkan 2 function berikut :
?
1
2
3
4
5
6
7
8
9
10
11
12
13
14
15
16
function update($id){
        $nama = $this->input->post('nama');
        $url = $this->input->post('url');
        $pesan = $this->input->post('pesan');
        $data = array(
            'nama' => $nama,
            'url' => $url,
            'pesan' => $pesan
            );
        $this->db->where('id', $id);
        $this->db->update('komentar', $data);
}
 
function select($id){
       return $this->db->get_where('komentar', array('id' => $id))->row();
}

?
1


Penjelasan singkat :
intinya nih, function update digunakan untuk aksi perubahan data. sedangkan function select digunakan untuk menampilkan data terlebih dahulu sebelum diupdate. untuk penjelasan masing-masing kode.
Langkah selanjutnya tinggal tambahkan saja pada file controller ckomentar.php berikut :
?
1
2
3
4
5
6
7
8
9
10
11
12
function updatedata($id) {
        if($_POST==NULL) {
            $this->load->model('mkomentar');
            $data['hasil'] = $this->mkomentar->select($id);
            $this->load->view('ubahkomentar', $data);
        }
        else {
            $this->load->model('mkomentar');
            $this->mkomentar->update($id);
            redirect('ckomentar/index');
        }
}

Penjelasan Kode :
jika dilogikan maka akan membentuk kalimat seperti berikut :
- jika $_POST bersifat NULL (kosong) dalam artian belum diklik tombol Update pada form ubah data, maka akan dilakukan sesi selanjutnya, yaitu me-load file model mkomentar.phpselanjutnya dikirimlah $id kepada function select dalam model mkomentar.. seperti yang sudah dibuat itu loh?.. untuk menampilkan datanya dulu.. kan konsep operasi ubah data itu, tampilkan data dulu baru dilakukan update. kurang lebihnya seperti itu.. nah pada aksi ini akan di-load file view ubahkomentar.php yang merupakan form ubah data itu sendiri.
- jika ternyata $_POST bersifat bukan NULL, maka akan di-load file model mkomentar.phpkemudian dipanggil function update dalam model mkomentar yang merupakan aksi perubahan data. kemudian akan diarahkan kepada halaman index.
karena pada skrip tersebut di-load form ubah ubahkomentar.php, maka kita tinggal buat saja formnya. skripnya seperti berikut :
?
1
2
3
4
5
6
7
8
9
10
11
12
13
14
15
16
17
18
19
20
21
22
23
24
25
26
27
28
29
30
31
32
<html>
<head>
    <title> Menambah Data </title>
</head>
<body>
<h3> Tambah Data </h3>
php echo form_open('ckomentar/updatedata/'.$hasil->id); ?>
 
<table>
<tr>
    <td> Nama </td>
    <td> : </td>
    <td> php echo form_input('nama', $hasil->nama); ?> </td>
</tr>
<tr>
    <td> Url </td>
    <td> : </td>
    <td> php echo form_input('url', $hasil->url); ?> </td>
</tr>
<tr>
    <td> Pesan </td>
    <td> : </td>
    <td> php echo form_textarea('pesan', $hasil->pesan); ?> </td>
</tr>
<tr>
    <td> php echo form_submit('submit', 'Submit', 'id="submit"'); ?> </td>
</tr>
</table>
php echo form_close(); ?>
 
</body>
</html>

Selesailah aksi dari proses tambah data ini..
untuk mengubah data tinggal buka saja url http://localhost/namaFolderCodeigniterAnda/index.php/ckomentar. terus tinggal klik saja link Editnya (itu juga jika Anda mengikuti step by step dari tutorial sebelumnya.
atau jika mau instan, bisa buka url http://localhost/namaFolderCodeigniterAnda/index.php/ckomentar/updatedata/idKomentar

CRUD Codeigniter – Menampilkan Data

Kita masih menggunakan tabel komentar. untuk menampilkan data, tambahkan pada file model yang telah dibuat sebelumnya, yaitu mkomentar.php.
?
1
2
3
4
5
6
7
8
9
10
11
12
13
14
class Mkomentar extends Model {
 function ambil() {
 $ambil = $this->db->get('komentar');
 if ($ambil->num_rows() > 0) {
 foreach ($ambil->result() as $data) {
 $hasil[] = $data;
 }
 return $hasil;
 }
 }
// function sesudahnya
}
?>

Penjelasan Kode :
- pada baris kode 1, merupakan skrip untuk membuat function bernama ambil.
- pada baris ke-2, skrip untuk mengambil seluruh data dalam tabel komentar, kemudian menaruhnya pada variabel $ambil. jika dalam PHP classic sama saja dengan kode $ambil = SELECT * from komentar.
- pada baris ke-3, jika jumlah (num_rows) pada variabel $ambil lebih dari pada 0, maka akan dilakukan sesi selanjutnya.
- pada baris ke-4, skrip untuk mengulang suatu perintah bernilai array menjadi kesatuan variabel $data.
- pada baris ke-5, menjadikan satu $data menjadi satu kesatuan $hasil.
- pada baris ke-7, sehingga akan menghasilkan nilai variabel $hasil. $hasil ini akan dikembalikan kepada function controller untuk ditampilkan.
setelah kita mengubah pada file model, maka selanjutnya kita juga menambahkan function baru pada file controller, yaitu pada file ckomentar.php. berikut skrip penambahan functionnya :
?
1
2
3
4
5
function index() {
        $this->load->model('mkomentar');
        $data['hasil'] = $this->mkomentar->ambil();
        $this->load->view('vkomentar', $data);
    }

Penjelasan Kode :
- Pada baris ke-1, merupakan perintah untuk membuat function index.
- pada baris ke-2, skrip untuk me-load file model mkomentar.
- pada baris ke-3, skrip untuk mengakses function ambil dalam class model Mkomentar, kemudian menyimpannya ke dalam variabel $data.
- Pada baris ke-4, skrip untuk me-load file view bernama vkomentar.php dimana telah disertakan variabel $data yang siap untuk ditampilkan pada file tersebut.
Langkah yang terakhir, karena pada function view di-load file view bernamavkomentar.php, maka kita buat file view dengan nama tersebut dan simpan dalam foldersystem/application/views.. skripnya sangat sederhana kok.. dan saya jamin.. pasti sudah tidak asing lagi ama yang uda hobi dengan PHP.
?
1
2
3
4
5
6
7
8
9
10
11
12
13
14
15
16
17
18
19
20
21
22
23
24
25
26
27
28
29
30
31
32
33
34
35
36
37
38
39
40
41
42
<html>
<head>
 <title> View Latihan 1 </title>
</head>
<body>
<h3> php echo anchor('ckomentar/tambahdata', 'Tambah data'); ?> </h3>
php
if (empty ($hasil)) {
 echo "Tidak ada data";
}
else {
?>
<h3> Daftar Komentar </h3>
<table border=1>
<tr>
 <th> No </th>
 <th> Nama </th>
 <th> URL </th>
 <th> Pesan </th>
 <th> Aksi </th>
</tr>
php
$no = 1;
foreach ($hasil as $data):
?>
<tr>
 <td> php echo $no; ?> </td>
 <td> php echo $data->nama; ?> </td>
 <td> php echo $data->url; ?> </td>
 <td> php echo $data->pesan; ?> </td>
 <td> <a href="updatedata/id; ?>"> Ubah </a> | <a href="hapusdata/id; ?>"> Hapus </a> </td>
</tr>
php
$no++;
endforeach;
?>
</table>
php
}
?>
</body>
</html>

Twitter Delicious Facebook Digg Stumbleupon Favorites More